
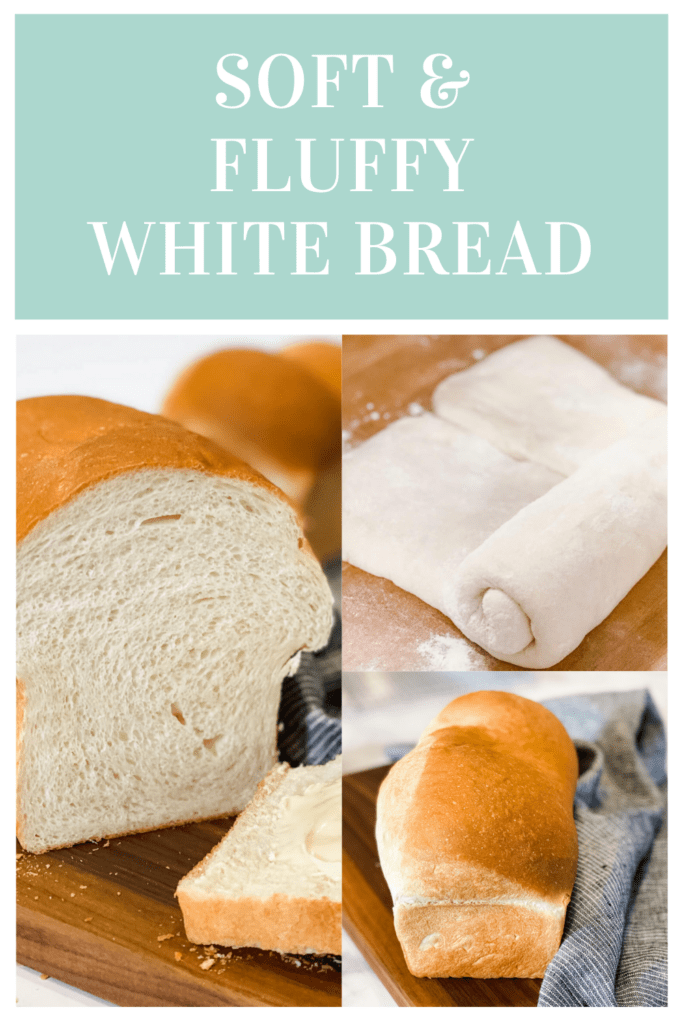
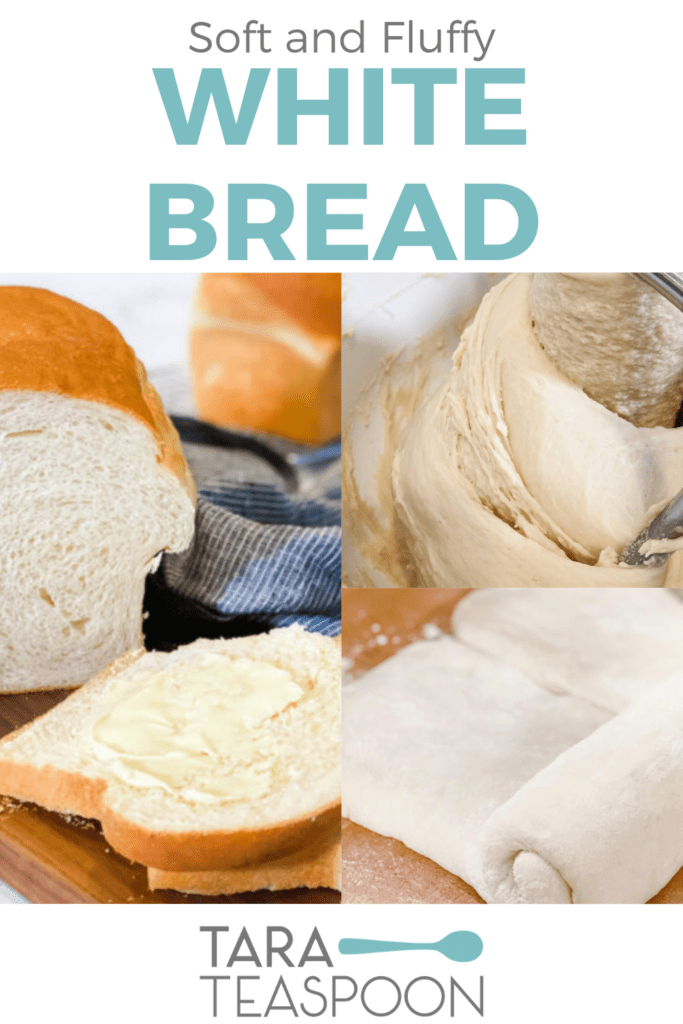
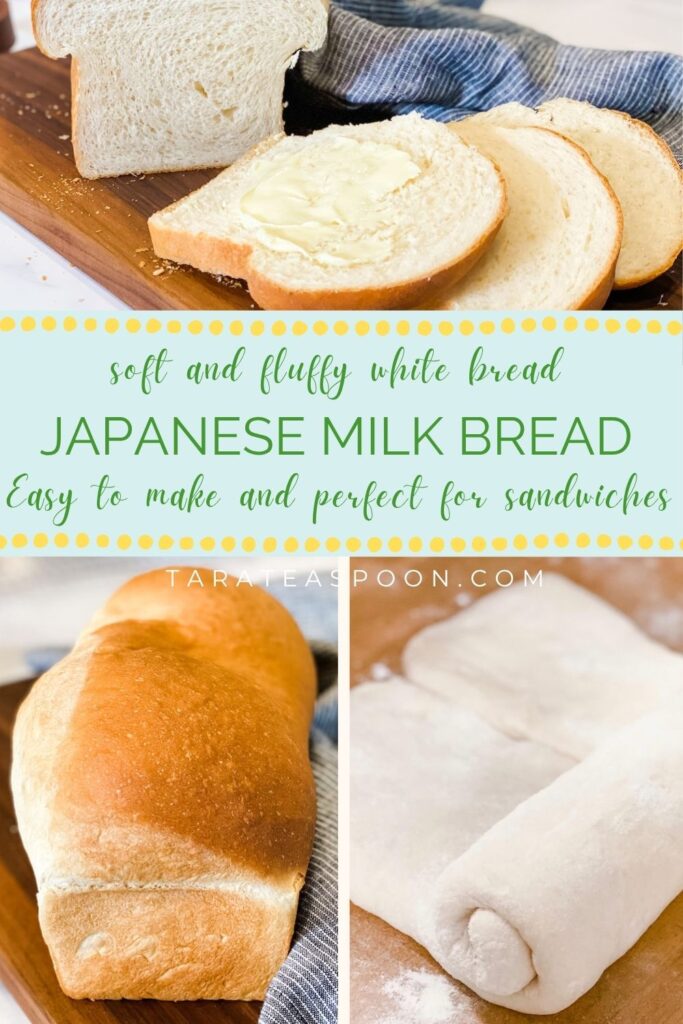
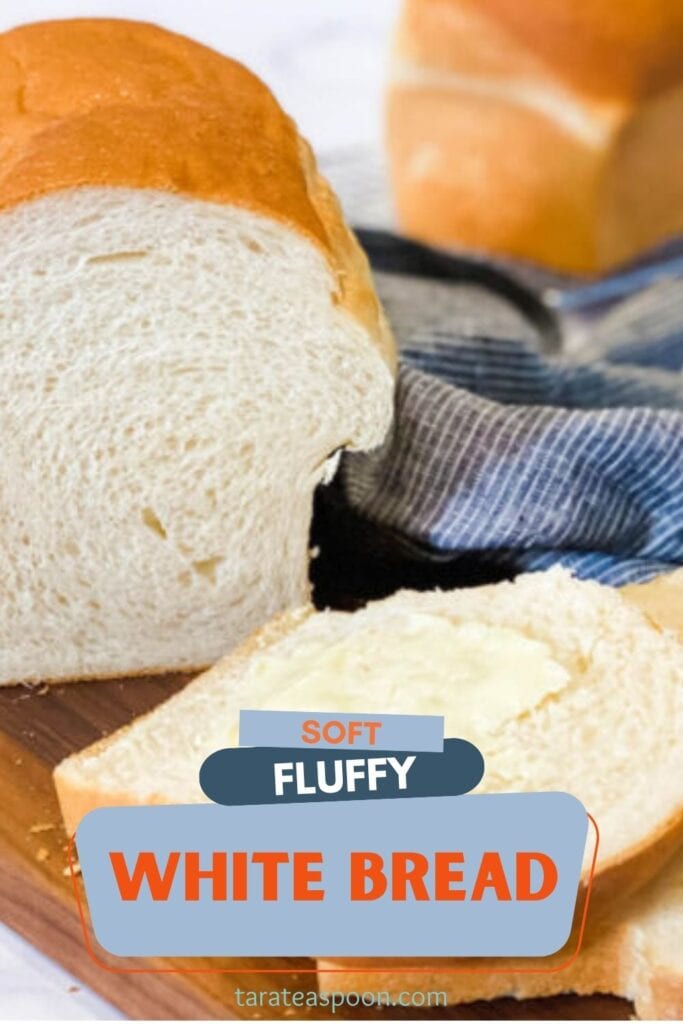
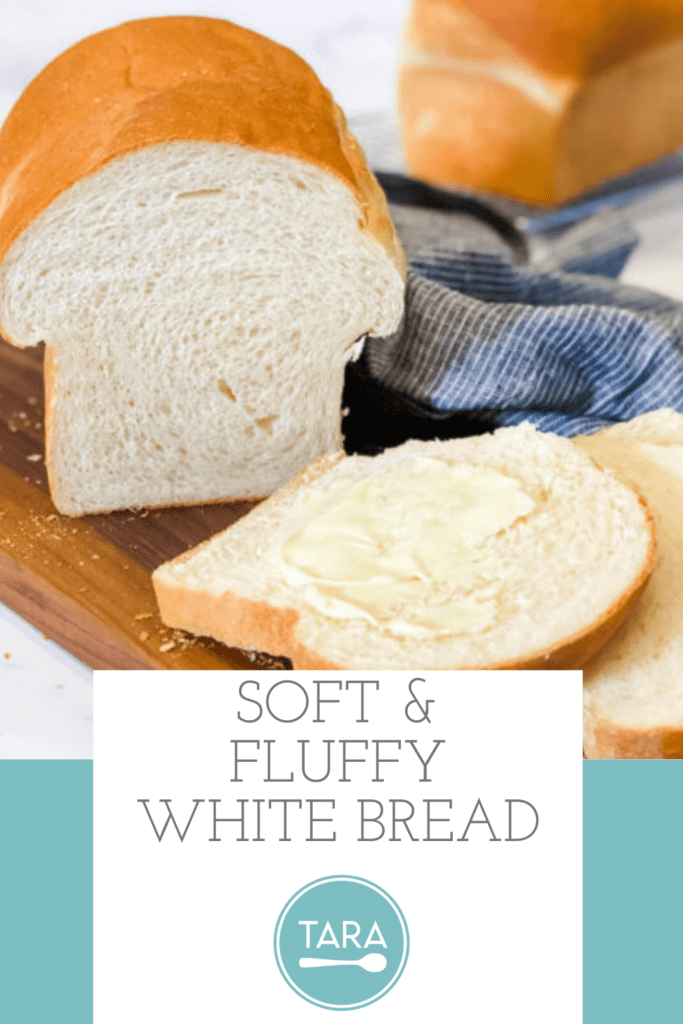
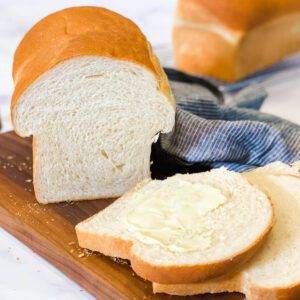
If you're searching for a soft and fluffy white bread recipe, this is it! I used the Japanese milk bread technique called Tangzhong. It's super simple, takes only a few hours, and creates a soft sandwich bread that you'll love.
Jump to:
This homemade white bread will blow your mind. It's completely soft like a cloud and tastes amazing. It's got one extra step (making a milk and flour jelly on the stove, called a tangzhong) and is still super fast and easy.
This is my favorite fluffy white bread recipe. It is seriously the perfect sandwich bread, both soft and flavorful. I even use this method of bread making in my luxuriously soft and fluffy cinnamon roll recipe.
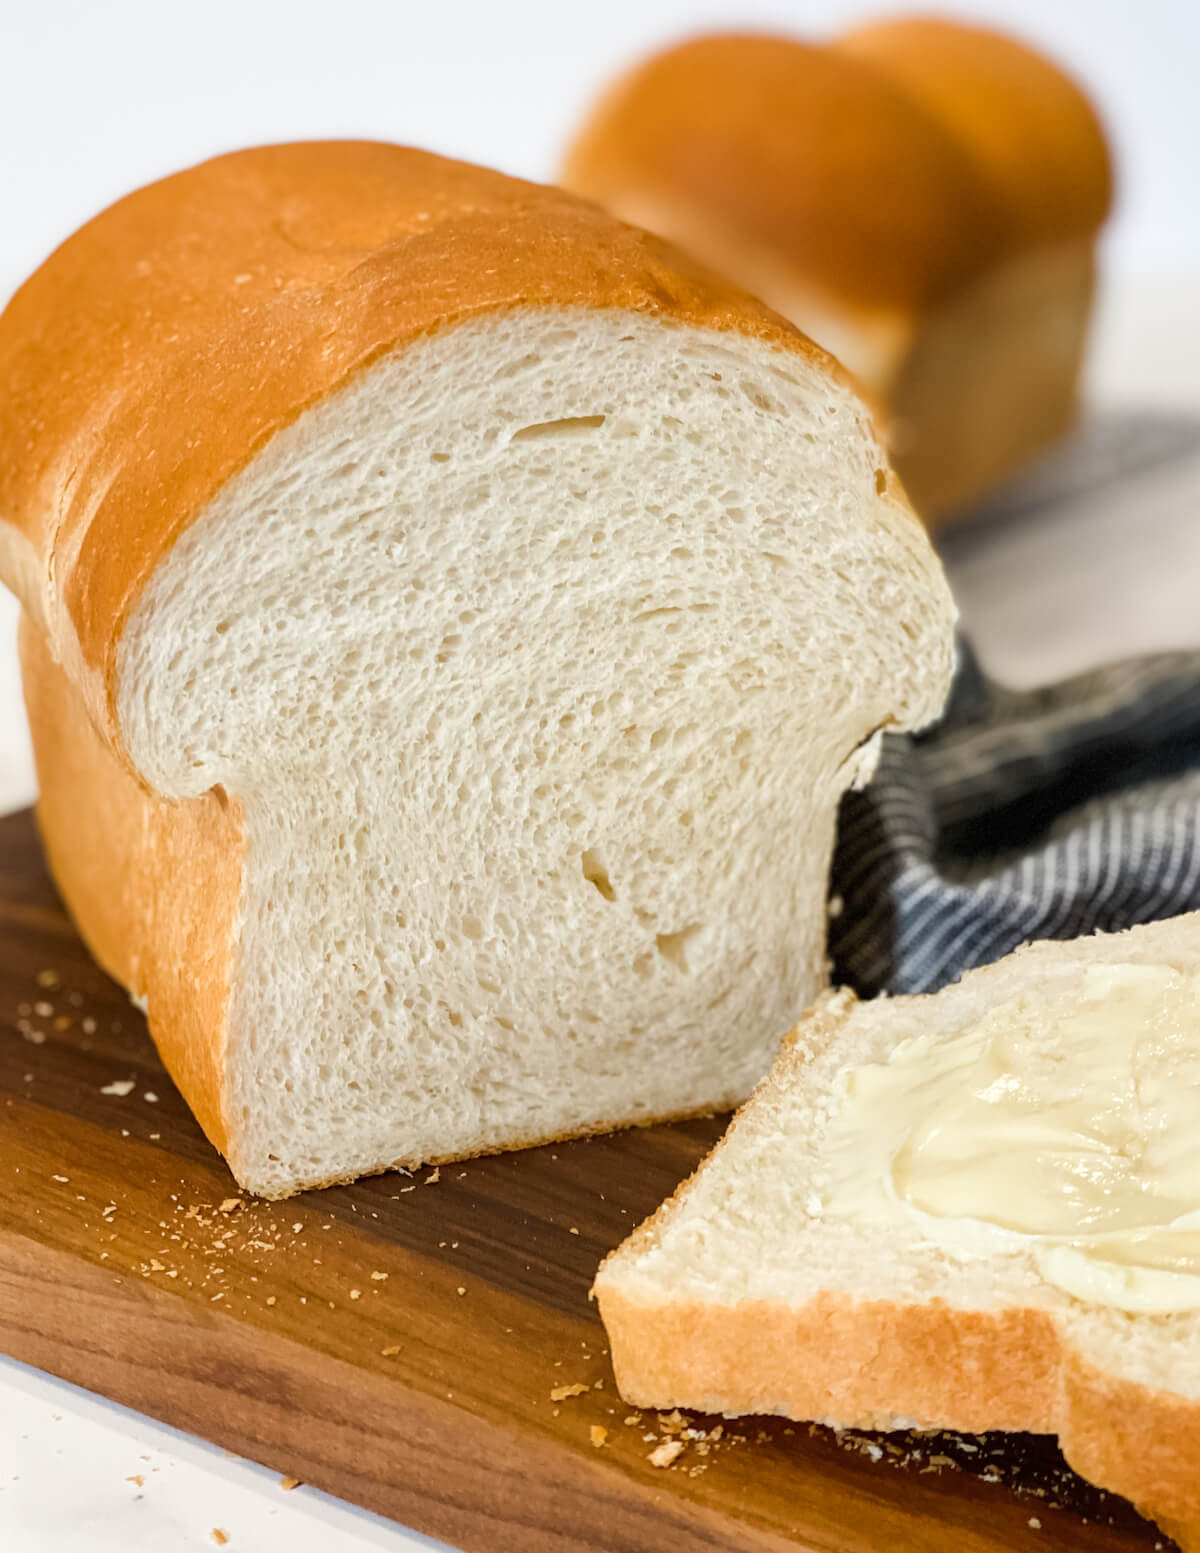
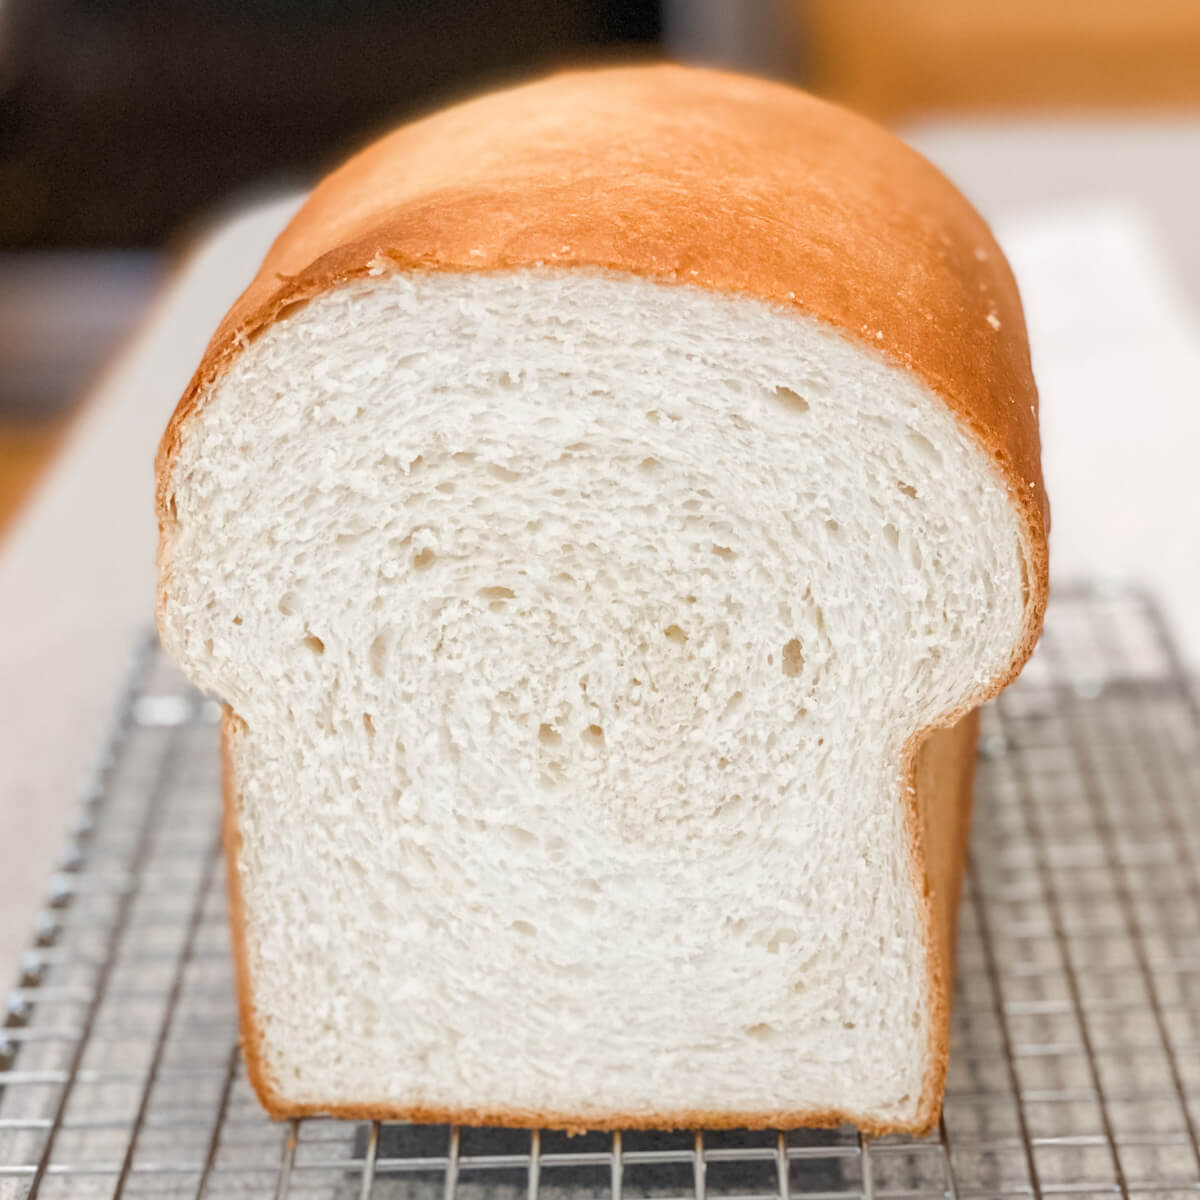
I find most homemade loaves delicious, yet dense or overly sweet, or they have a course crumb. A coarse crumb doesn't mean it's not soft, just that the texture is more coarse or heavy, say, compared to Wonder Bread.
My love for this soft and fluffy white bread doesn't negate my fond memories of classic homemade loaves mom would make. The sliced white sandwich bread made day in and day out in our homes is still fantastic. Just different!
The texture of this bread is a genius mix between a classic homemade loaf of bread, a soft store-bought white bread, and buttery brioche.
In some circles, it's called milk bread and it's light, moist, and pillowy soft all at the same time. It's like the white bread and rolls you get from Chinese and other Asian-style bakeries. You find flavors of milk, eggs, and butter, with a classic homemade-bread-sweetness that makes it a great sandwich loaf.
What Is Milk Bread?
Milk bread goes by many different names, and as far as we know it originated in China as Shokupan or Hokkaido. In Korea it is called Uyu Sikppang.
This soft, airy, cloud-like bread is commonly referred to as Japanese milk bread and is popular in the bakeries of many Asian countries including Japan, China, Taiwan, and Korea. You can even find this style of bread at bakery chains like Paris Baguette, which is a Korean franchise!
Asian-style milk bread is different than American homemade sandwich bread. It's a bit closer in texture to Wonder Bread but has an amazing homemade flavor. It doesn't crumble or tear the same as American style bread. And, it's what panko bread crumbs are made of!
Cooks across Asia were introduced to making this bread at home in 2007 with a book called 65ºC Bread Doctor, by Yvonne Chen. It's been covered in many American baking books since then and online outlets like King Arthur Flour have great recipes.
What Makes This Recipe Unique?
This fluffy white bread recipe is different than a homemade country loaf of white bread because of a special flour and milk roux called Tangzhong. It gets mixed and cooked before being added to the pretty standard bread recipe.
Sounds simple and sort of odd, but it works wonders. Miracles even!
The tangzhong method is most often used in China to make buns with a soft, fluffy texture. I've enjoyed these in Chinatown here in New York! They are often filled with savory or sweet coconut fillings and brushed with a heavy egg wash before baking so the top is glossy and dark.
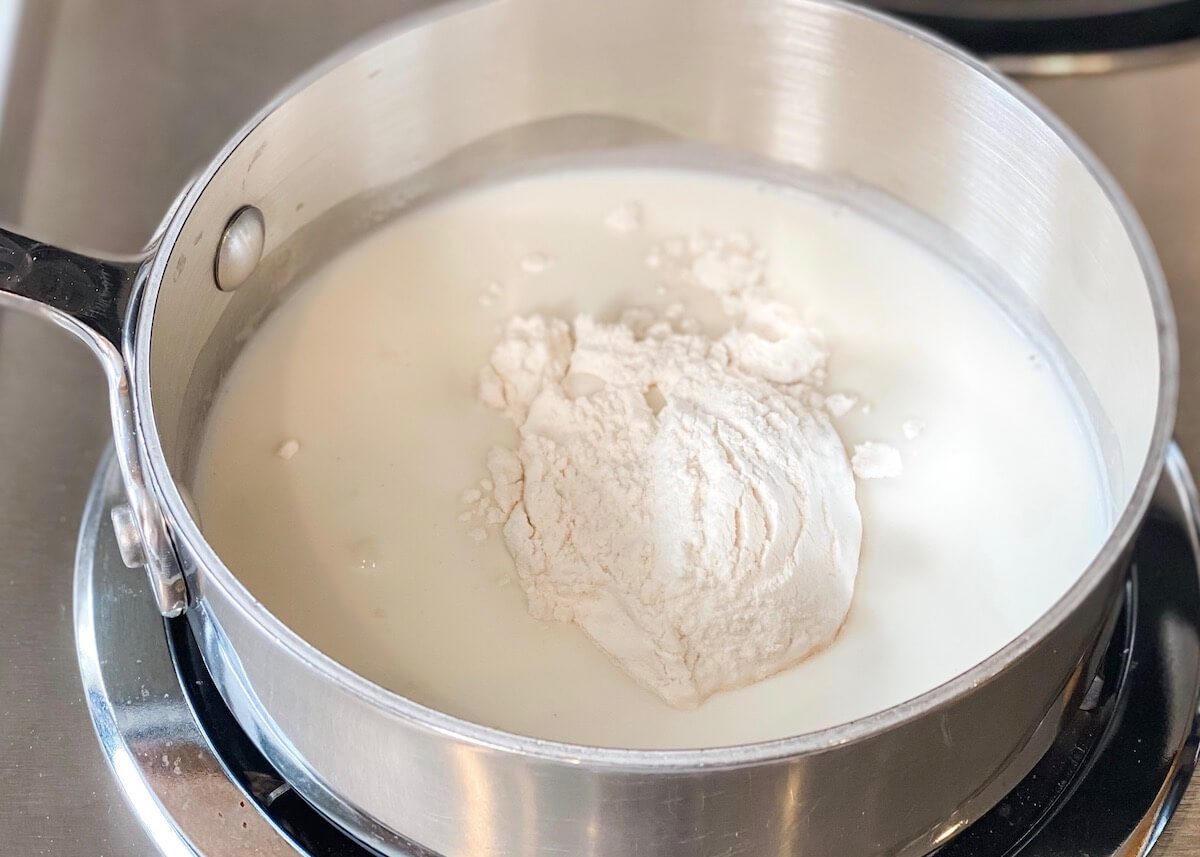
Making a Tangzhong Starter
The tangzhong method is flour, milk, and sometimes water mixed together and heated to create a roux. It's actually quite pudding-like in texture and forms a gel.
This gel is added to the bread dough and the science is that the already moisturized flour or pre-gelatinized starches can absorb more water.
The flour will absorb two times as much hot milk as it does the warm water or milk you'd usually use in yeast dough. This roux holds moisture in the loaves of bread as well as helps create a fine crumb and texture. The tangzhong post on King Arthur explains it so well.
The Benefits of Tangzhong
- The bread may rise higher, because of more liquid creating more internal steam.
- The bread will be moister and will stay soft and fresh longer because of the moisture the loaves retain.
Tangzhong starter is technically supposed to be a pourable consistency with 1 part flour to 5 parts liquid (1:5 ratio in volume) while some other recipes use 1 part dry to 3 part liquid ratio.
My recipe is more of a 1:3 ratio. Roughly 1 tablespoon flour to 2 ½ tablespoons milk. This makes the roux thicker but it works like a charm.
How to Make Homemade White Bread
Simple steps and tips for making the perfect soft, Tangzhong milk bread loaves. See the recipe card below for process shots and detailed instructions.
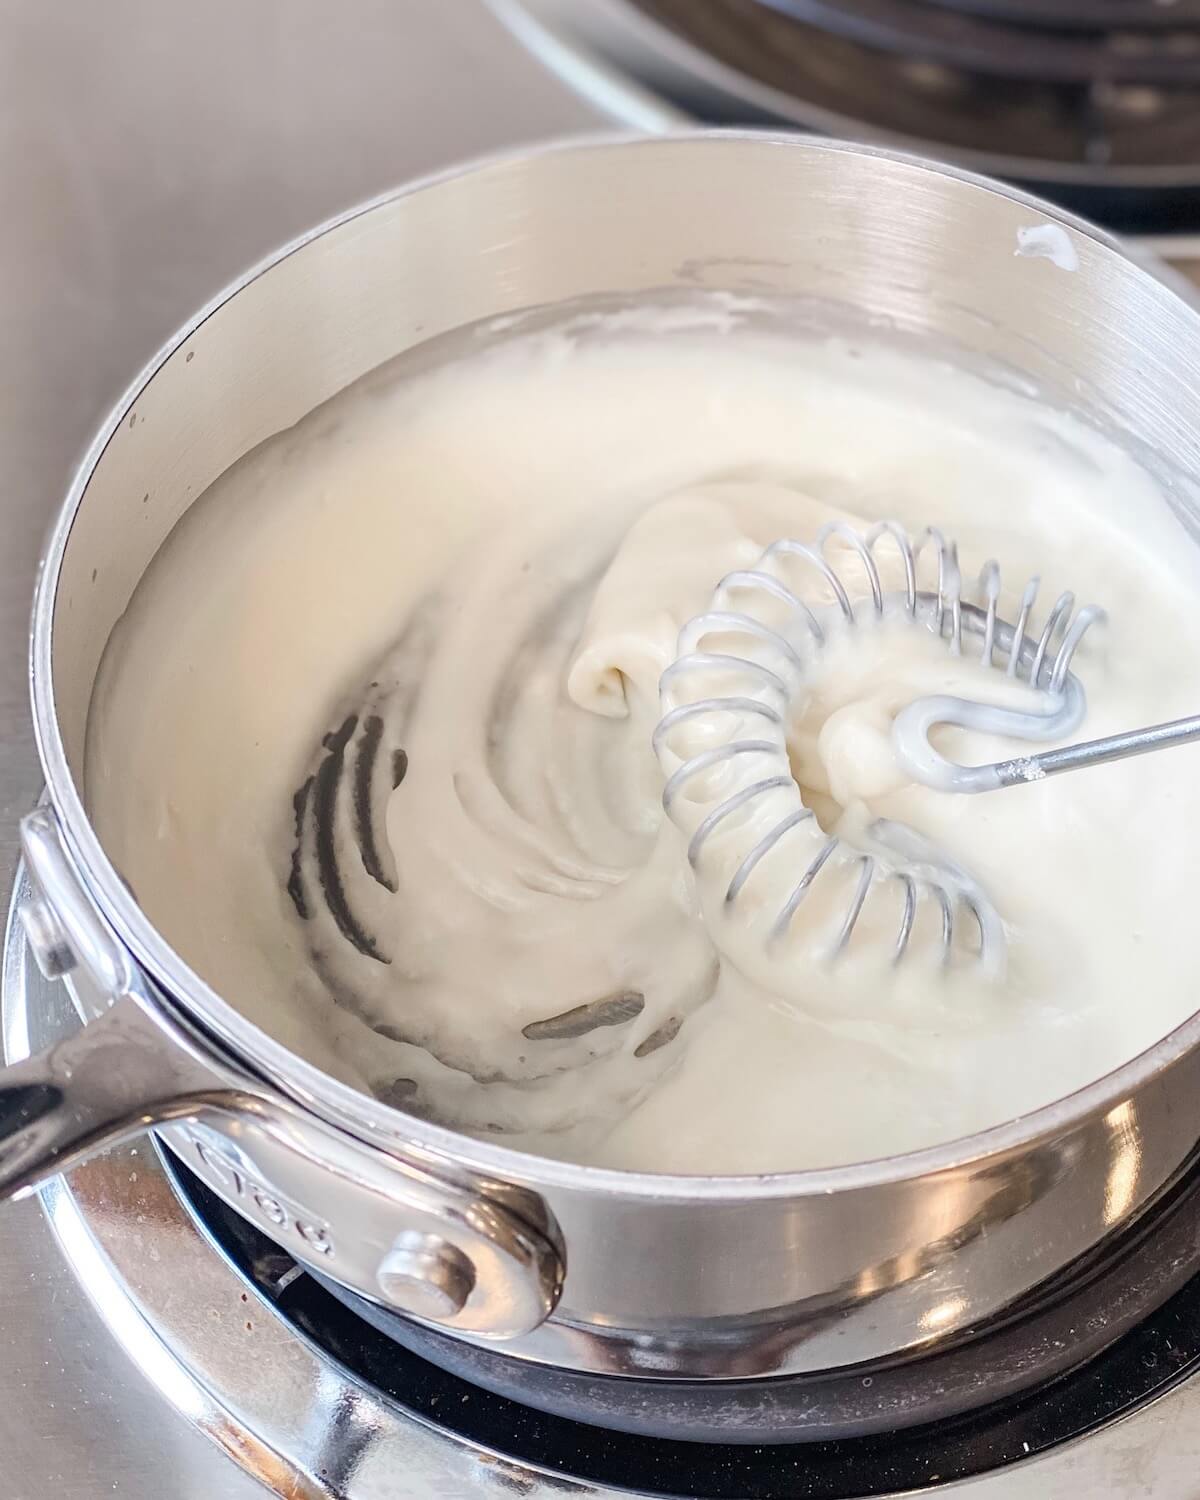
Step 1: Make the Tangzhong starter first so it can cool.
- Mix the flour and milk together in a saucepan and cook, whisking constantly until it is just starting to thicken like pudding. I really like this whisk.
- Cover with plastic wrap and let cool or place in the fridge.
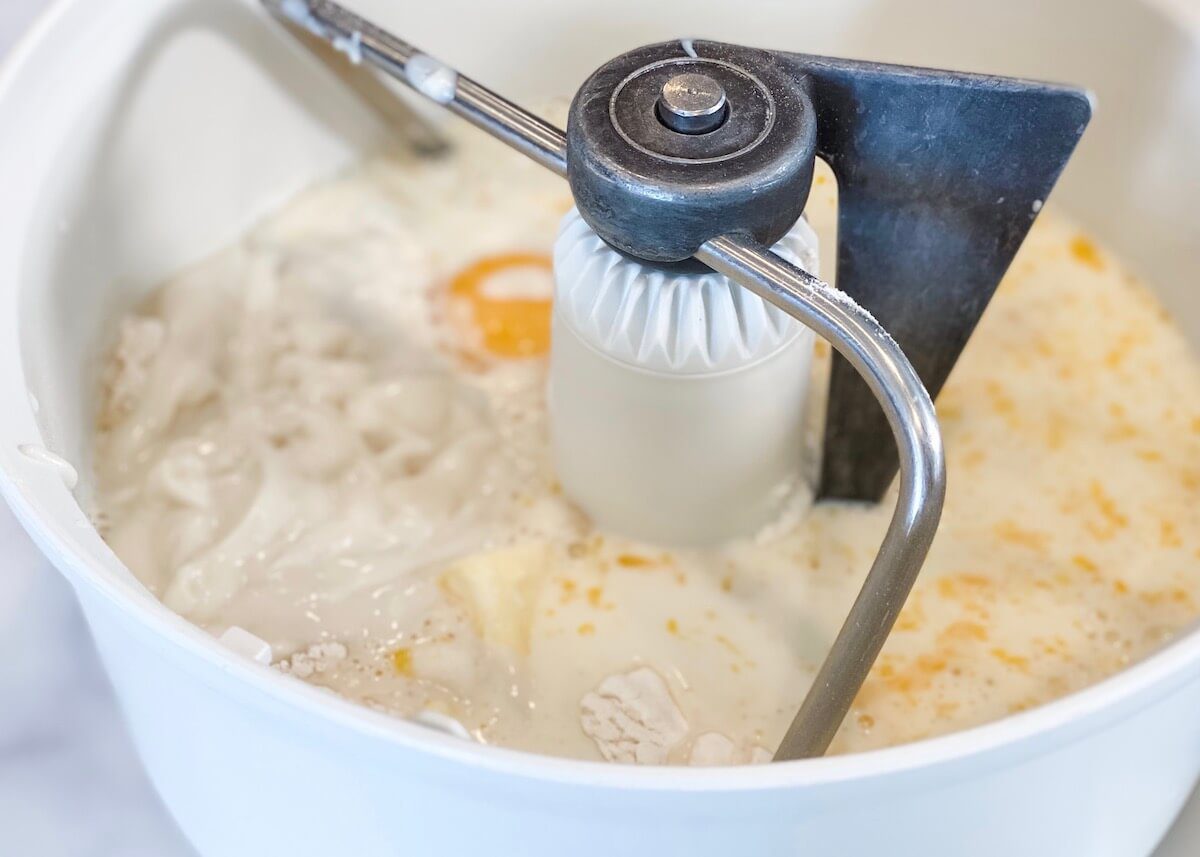
Step 2: Mis en place, or assemble all the bread ingredients and make sure they are warm or close to room temperature.
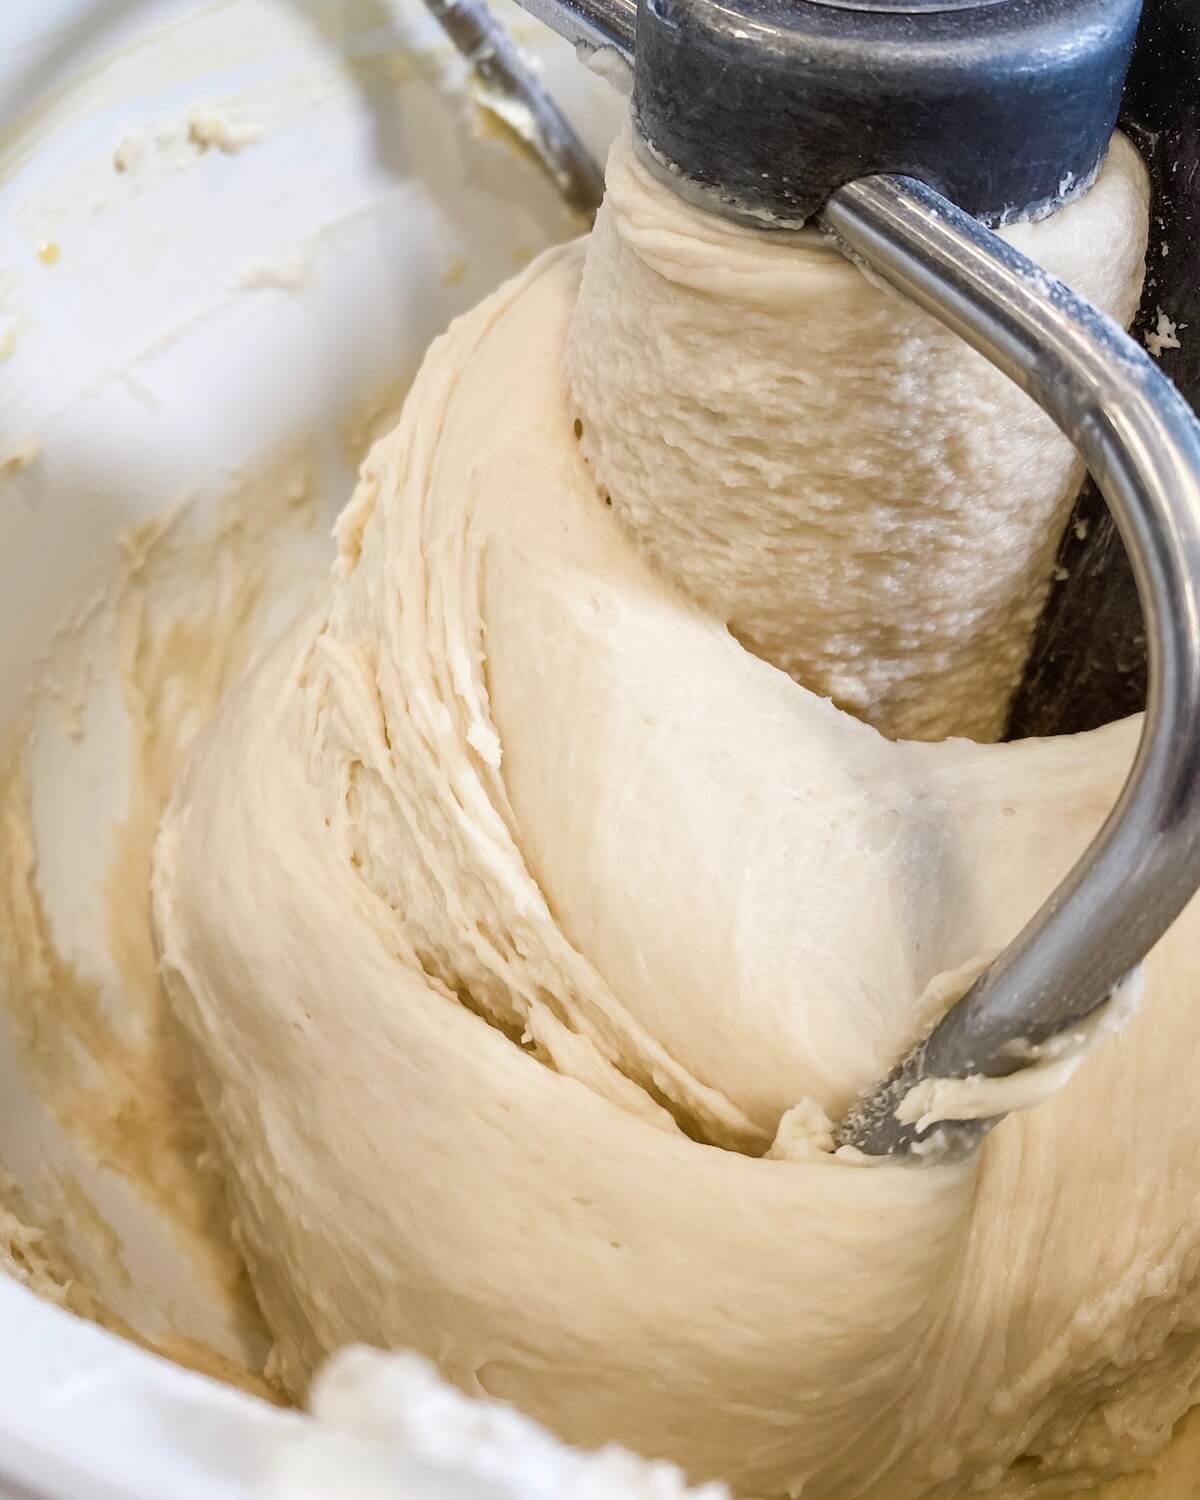
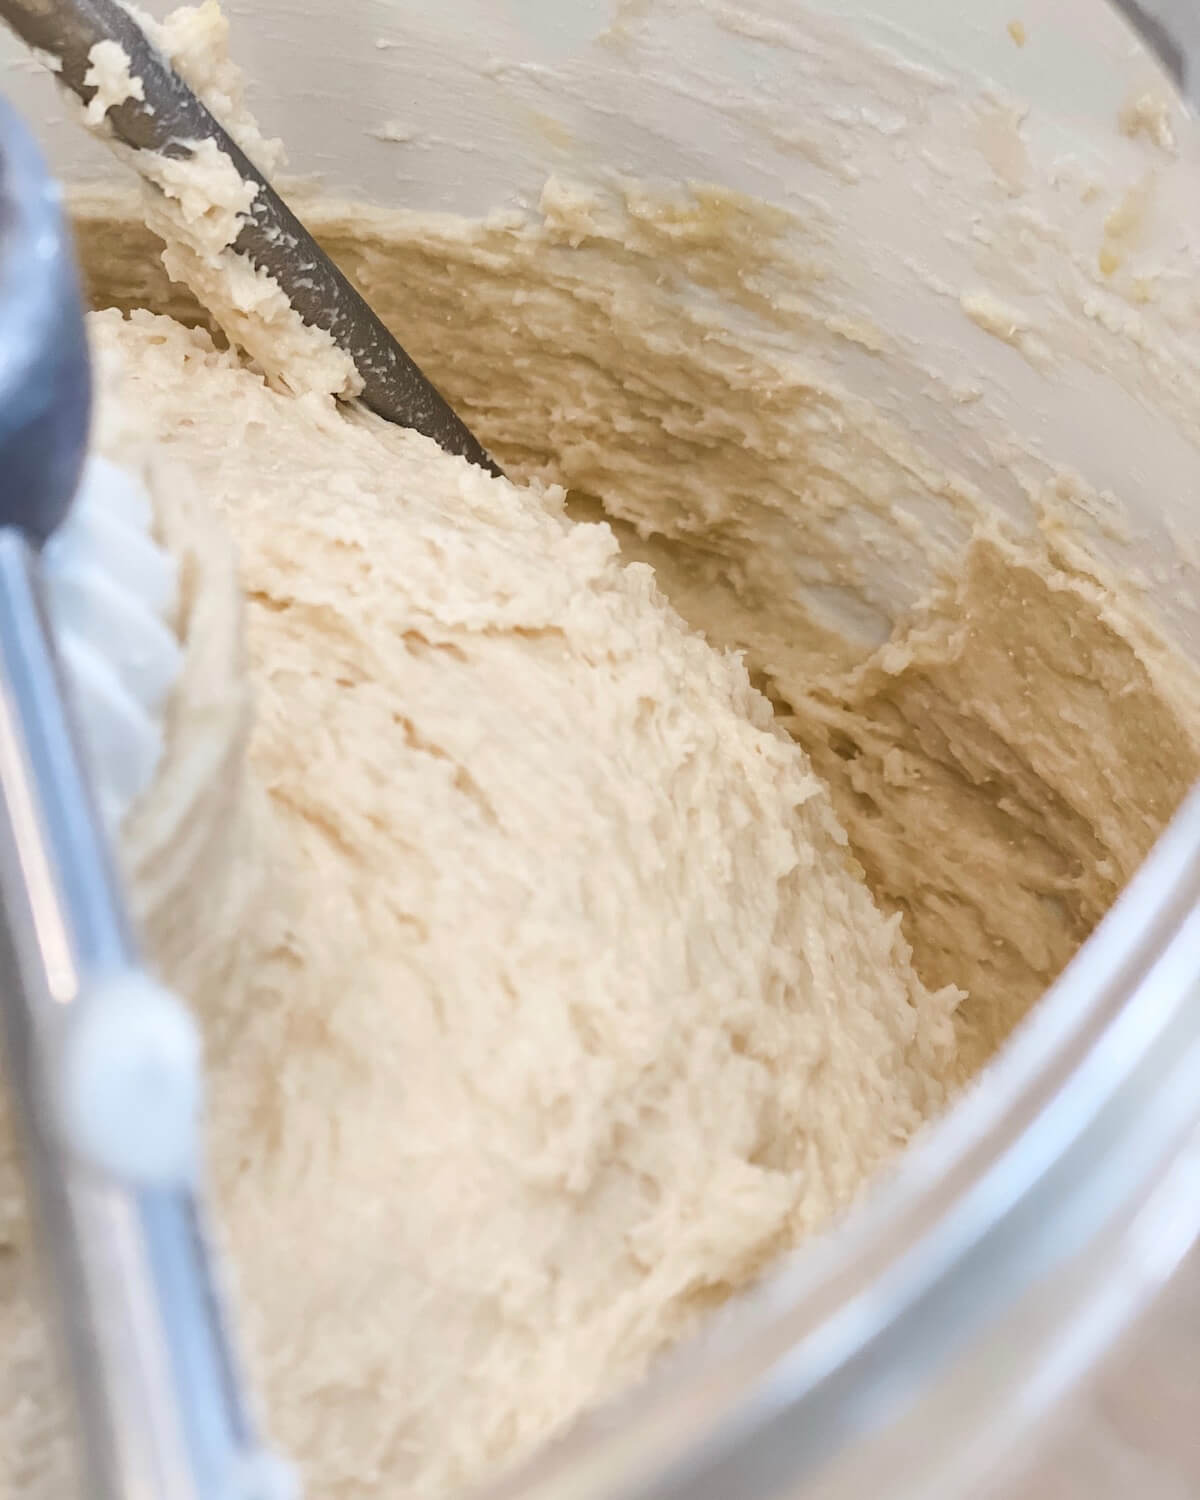
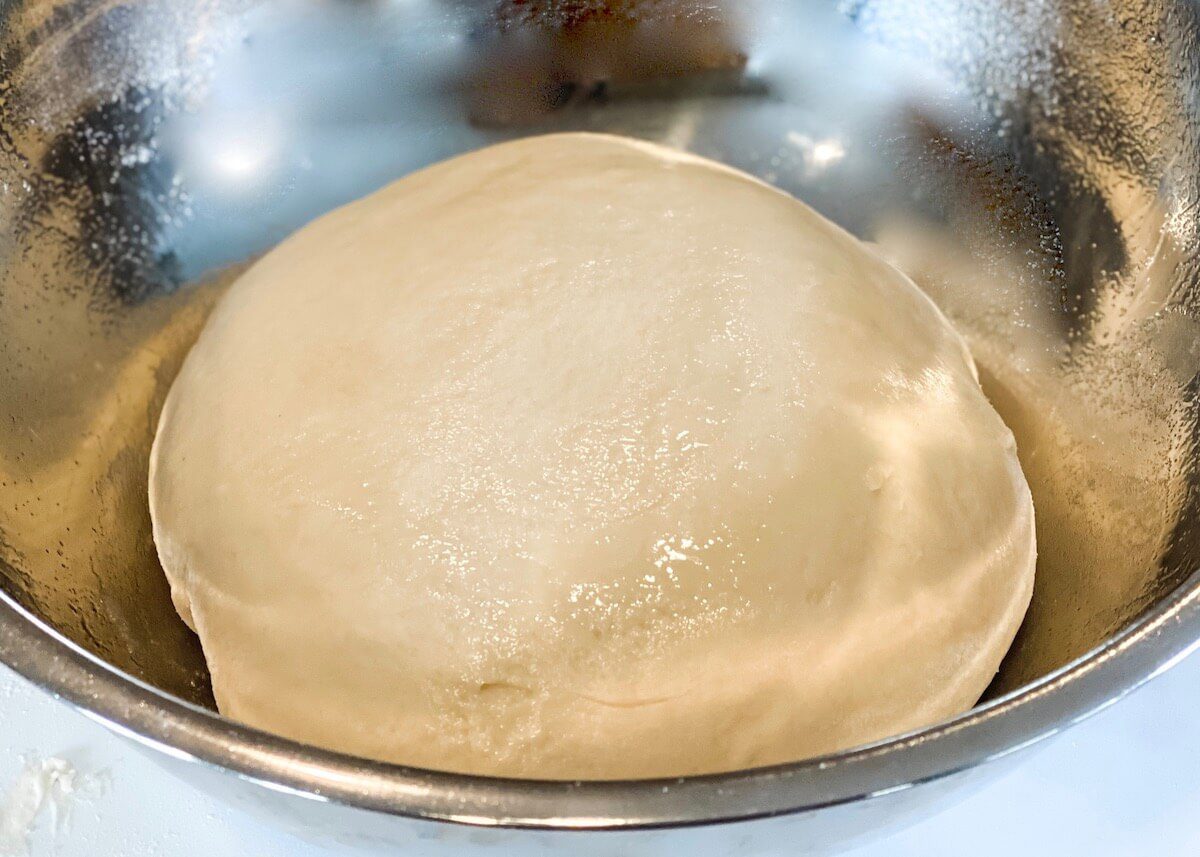
Step 3: Mix the dough and let the mixer knead it for about 12 minutes. This creates the gluten strands.
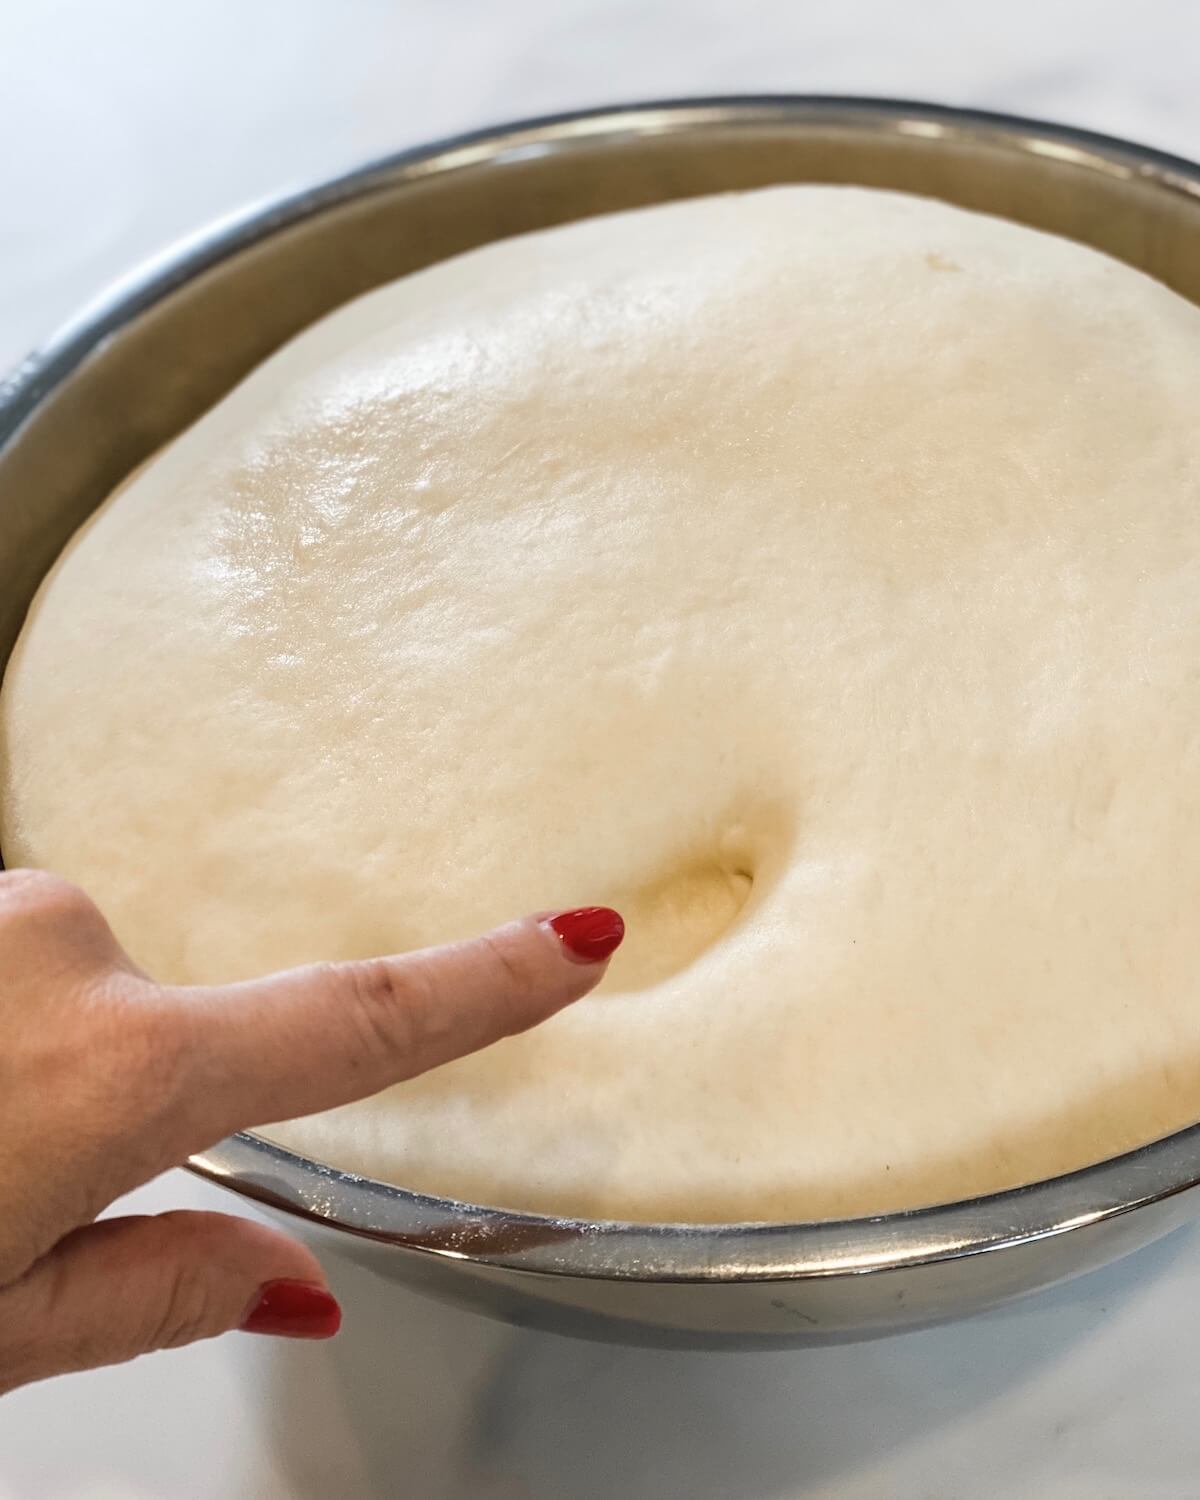
Step 4: Proof or let rise in a greased bowl, covered, until doubled in size.
- I heat my oven to 100ºF, then turn it off to create a warm space for my dough. It should be a warm, but draft-free space.
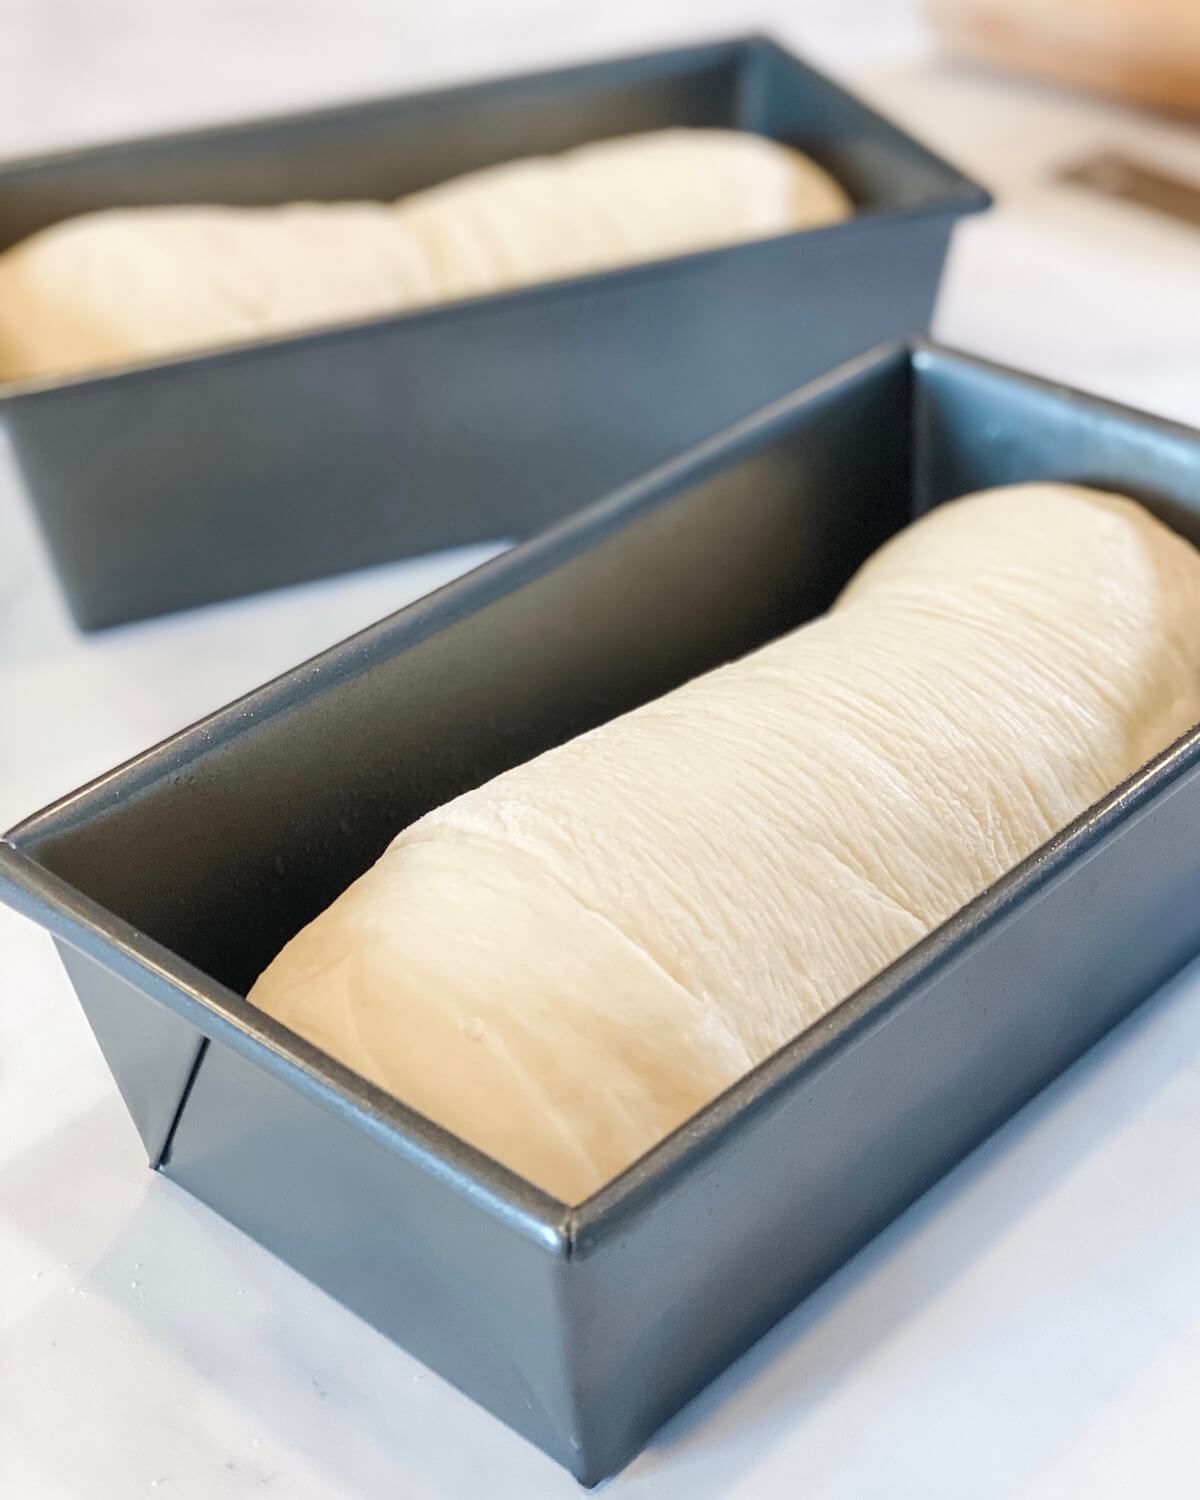
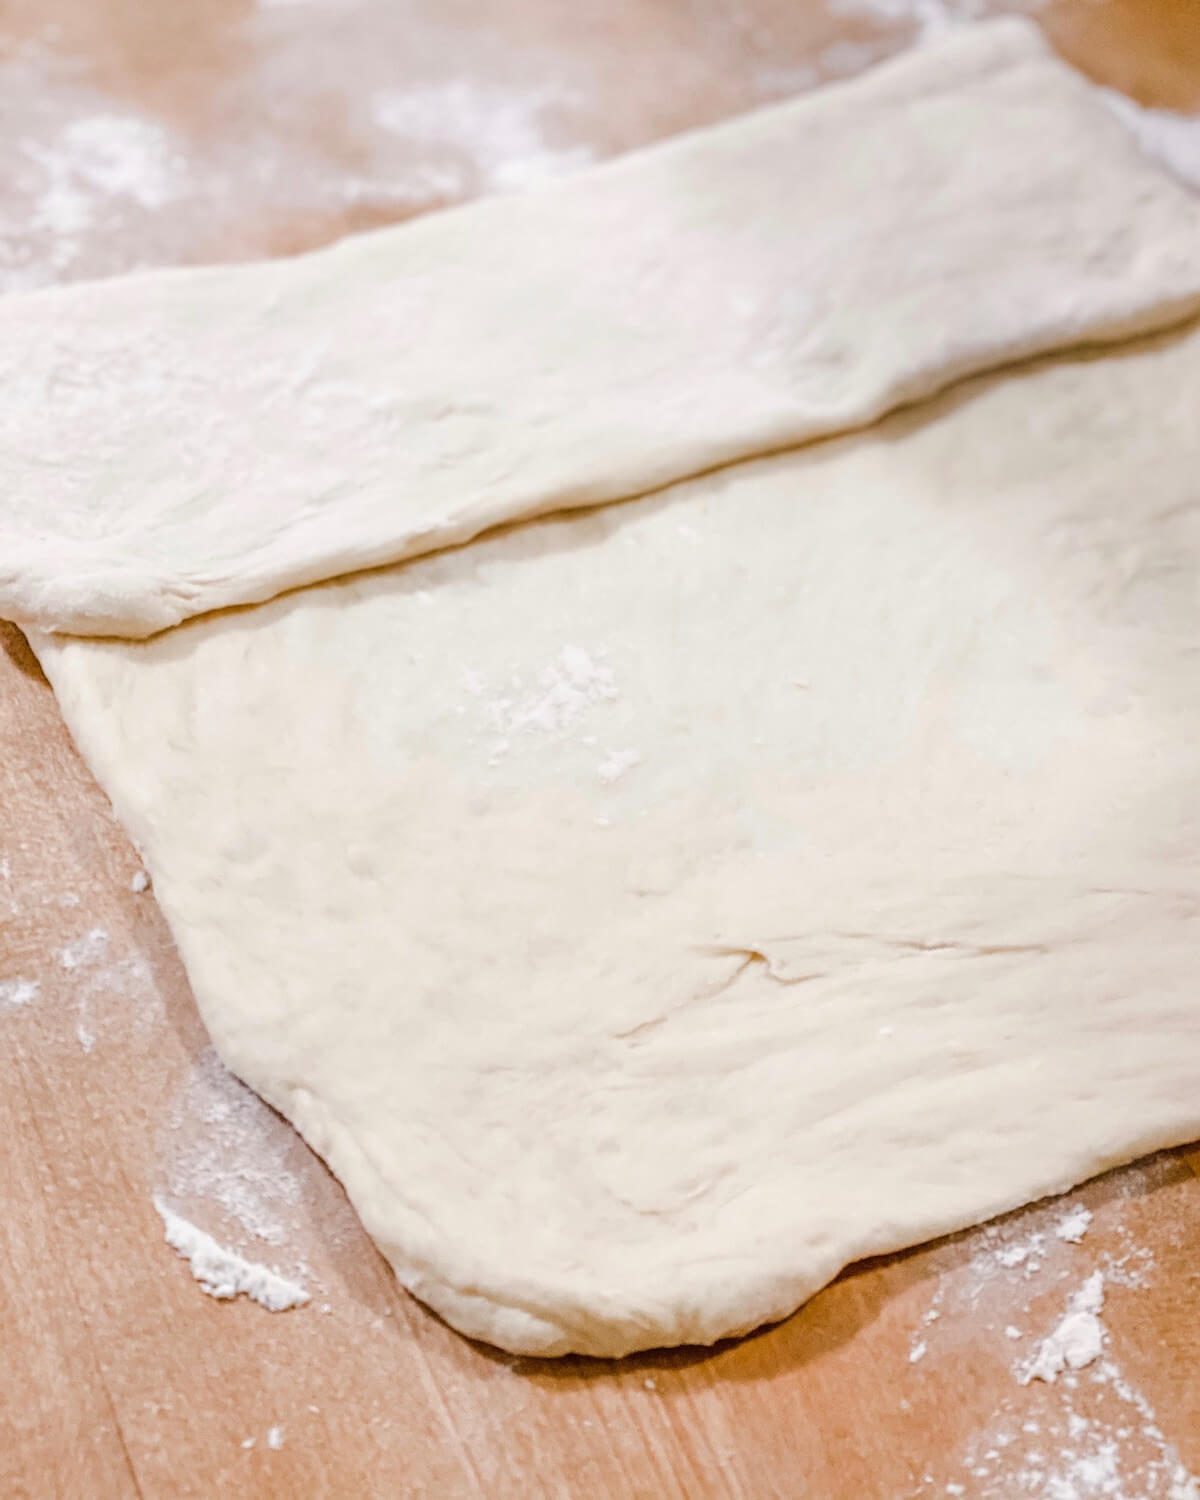
Step 5: Divide dough in half and form loaves. I like to weigh the dough so my halves are equal. This food scale is awesome.
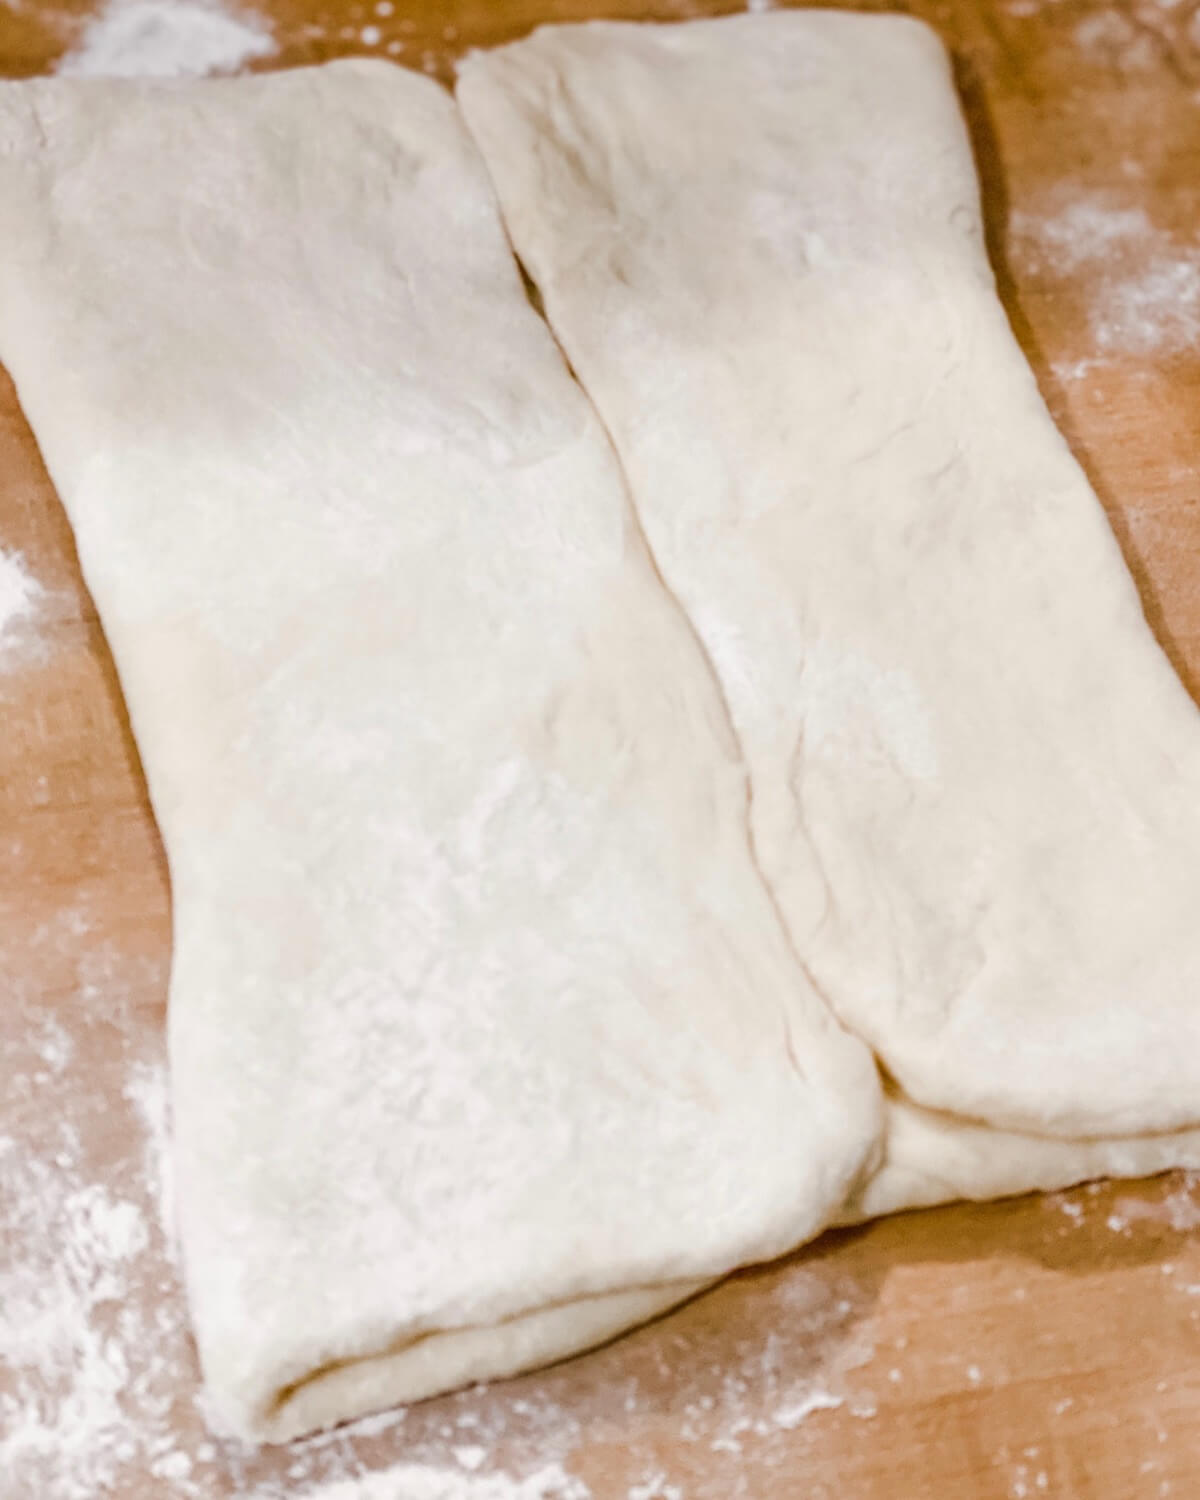
- Form loaves however you'd like. I prefer the structure of loaves folded like classic Japanese milk bread. Follow the how-to pictures in the recipe.
- You can also make 3 smaller loaves if you'd like!
Step 6: Let the loaves proof or rise a second time in a warm, draft-free area. Not quite doubled in size.
- Preheat your oven during this second rise. Use an oven thermometer to achieve the perfect temperature.
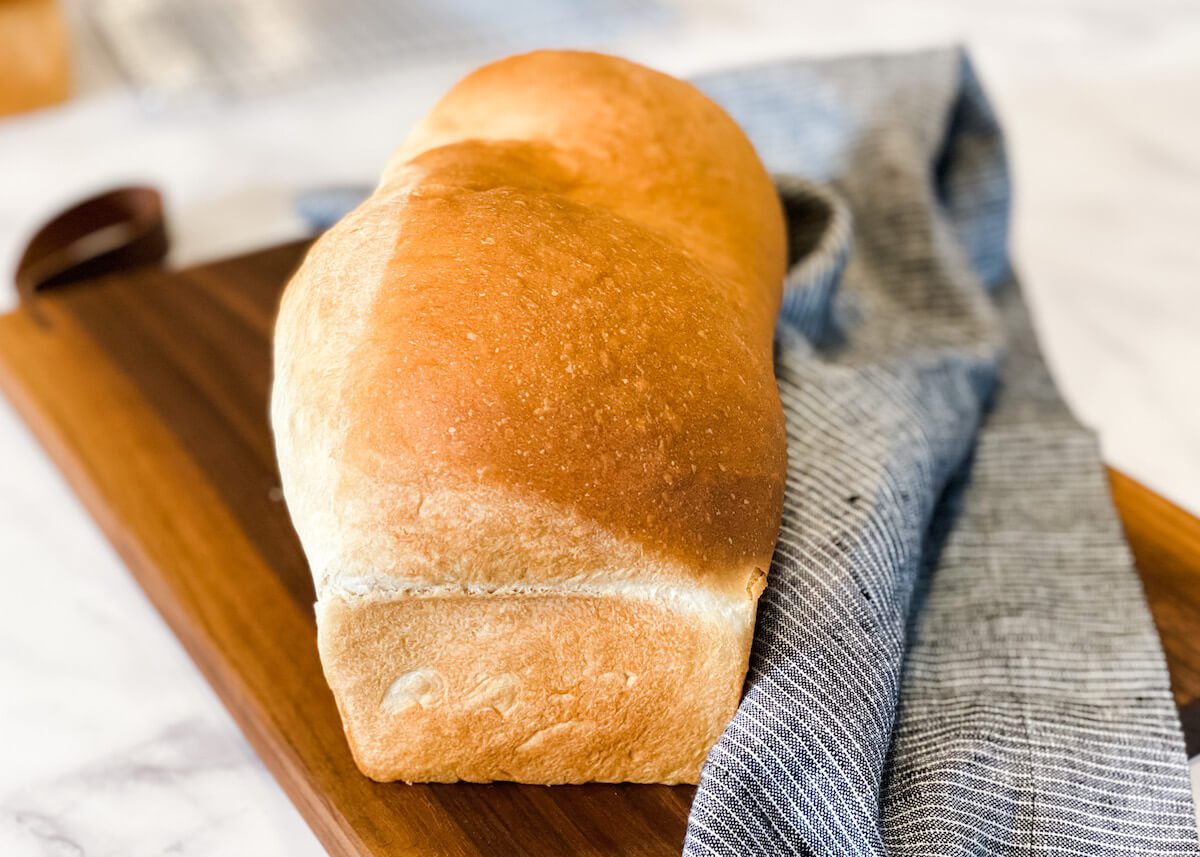
Step 7: Bake loaves until dark golden brown and cooked through. Let cool in pans for a couple of minutes before cooling completely on a wire rack.
FAQs
Although this soft white bread recipe is easy, it does require time and patience to prepare. Here are the answers to some commonly asked questions about preparing this white bread loaf using the Tangzhong method.
Do Have to Weigh the Ingredients?
While not everyone will have a kitchen scale, I highly recommend getting one. I like this scale.
Weighing the ingredients guarantees accuracy and will result in loaves just like mine. If you do not weigh the flour, you will most likely add too much flour and the bread will be a little more dense. It will still taste great, but you won't have the same texture as the tested loaves.
Can I Use Different Sized Pans?
You can use any bread pan you like. The old standard is 9-by-5-inches and makes two gorgeous large loaves.
If you're using 8 ½ - by - 4 ½ - inch loaf pans I suggest using 3 pans and dividing the dough equally between them.
Can I Double This Recipe?
Yes, doubling the recipe shouldn't be an issue. Just make sure you have enough loaf pans on hand!
What Type of Yeast Should I Use?
You'll want to use instant dry yeast, NOT active dry yeast.
And yes, you'll need to use 2 tablespoons of yeast, not 2 teaspoons. It's not a typo, promise!
More Easy Bread Recipes:
- Finnish Cardamom Bread - a classic Pulla bread recipe
- Soft and Sweet Cornbread - the ultimate cornbread recipe
- Orange Nut Swirled Bread - use this recipe or frozen bread dough
- Whole Wheat Walnut Pumpkin Bread - a seasonal favorite
📖 Full Recipe
Soft and Fluffy White Bread Recipe
Video
Ingredients
Tangzhong:
- 6 tablespoon all-purpose flour
- 1 cup whole milk
Bread:
- 1⅓ cups (350 ml) whole milk (warm)
- 6 cups (720 g) all-purpose flour
- ¼ cup (50 g) granulated sugar
- 2 teaspoon fine salt
- 2 tablespoon instant dry yeast (NOT active dry)
- 2 large eggs
- 4 tbsp (60 g) unsalted butter, room temperature
Instructions
For the Tangzhong:
- This needs to cool a bit before using, so plan for about 20 minutes.

- Whisk together the flour and milk in a small saucepan over medium heat. Cook, whisking constantly until mixture begins to thicken. Stir until mixture is just barely paste consistency, like warm pudding. Remove from heat. Quickly transfer to a bowl, cover with plastic wrap and let cool a bit (I put mine in the fridge).

For the Bread:
- When the Tangzhong starter is warm but not hot start the bread. In the bowl of a stand mixer or Bosch with the dough hook, mix together the warm milk, Tangzhong, sugar, yeast, salt, eggs and butter.
- With the mixer on low, add the 6 cups flour. Scrape down the sides of the bowl and let the mixer knead the dough on medium or medium-low speed for 12 minutes. The dough will be sticky and become more smooth as mixing happens. Scrape down the sides of the bowl periodically as needed, so everything mixes evenly.
- After 12 minutes the dough will be tacky but smooth and not as rough as at the beginning.
- Turn into a greased bowl, pull in the edges to make a ball then turn over so the round, oil-coated surface is on top. Cover with a towel or plastic wrap and set in a warm place to rise (I use a 100ºF warmed oven that has been turned off).
- Let dough rise until it is almost double in size and an indent stays when poked with a finger, instead of bouncing back, 30 to 45 minutes depending on how warm the environment is.
- Grease 2, 9-by-5-inch loaf pans or 3, 8½-by-4½-inch standard loaf pans. Turn dough out on a pastry cloth or lightly floured surface. For 2 loaves, divide into 2 equal amounts, weighing if desired. For 3 standard loaves, divide dough into 3 equal parts.
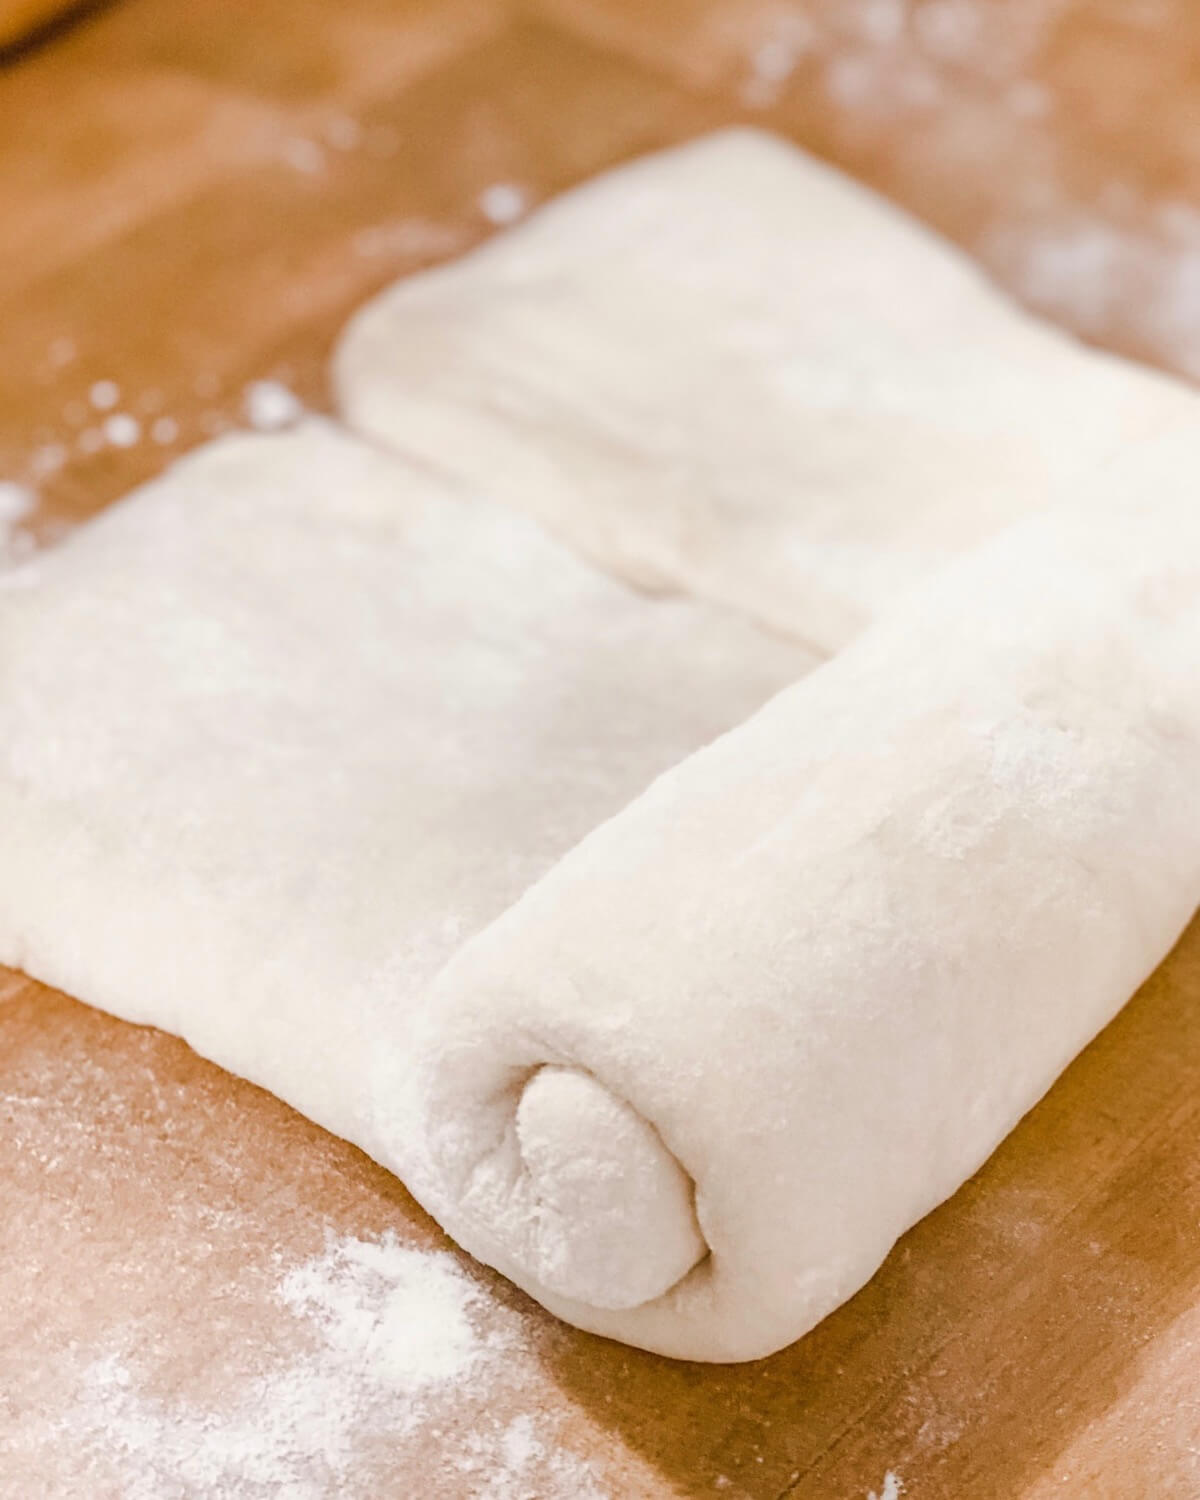
- Roll each piece into a rectangle about 15 inches in length (12 inches for smaller loaves), and 9 or 10 inches wide. Bring the two long ends together to meet in the middle.
- You can shape the dough as needed to maintain a rectangle.
- This technique is not necessary, but helps the loaf have an even gluten structure when baked. Don't use excess flour.
- Then roll up the center to create a loaf. Pinch the long edge together on the bottom of the loaf. Place in greased loaf pans.
- Lightly cover and let rise a second time until almost double in size, 15 to 25 minutes, depending on how warm the environment is. When you poke in your finger it should stay and only push back slowly.
- While dough rises a second time, heat oven to 350ºF. Use an oven thermometer to check the accuracy of the oven temperature.
- When loaves are ready, bake until deep golden brown, about 25 minutes. You can rotate pans halfway through cooking if your oven has hot spots. Let loaves cool in pans 1 or 2 minutes, then turn out onto a wire rack to finish cooling.


Notes
Nutrition Per Serving
Delicious Sandwich Recipes


Tara Teaspoon
I’ve been in food publishing for over 25 years, creating recipes & food-styling for magazines, books, television, food brands, & advertising. With two cookbooks under my belt and thousands of my recipes at your fingertips, I hope you'll be inspired to spend more time in the kitchen!
Devin says
would I be able to put this in a 13x4 Pullman pan?
Tara Teaspoon says
Devin I haven't tested it in a Pullman pan, but my first instinct is the full batch might be too much for that pan. I'd use 1/2 or 2/3 of the dough first to test the size in the Pullman pan. Do let us know how it turns out!
Vik says
could the dough be mixed and allowed to rise overnight in the refrigerator? before shaping into loaves? after shaping into loaves?
Tara Teaspoon Admin says
Hi Vik. I've never made it that way, but typically white bread does ok when it rises overnight in the fridge. You'll have the best results if you let the entire bowl of dough rise for the first proof. If you try to shape the loaves first, you run the risk of having them overproof. Overproofed dough bakes into dense, flat, and/or gummy loaves.
In the morning after the first proof, shape the loaves and let them rise at room temperature. Keep in mind, that you'll need to adjust the timing of the 2nd proof/rising since the dough will be cold. It will take much longer for the loaves to rise in their pans.
If you try this method, leave a comment and let us (me and other readers!) know how the bread turned out. Can't wait to hear. Thanks!
Lorraine Rutherford says
Hello - on a side note...when I click 'print recipe" it prints several blank pages before printing the recipe. Kindly check settings... 🙂 Going to give recipe a try now...
Tara Teaspoon Admin says
Hi Lorraine. I hope the recipe turns out amazing for you! I checked the print settings and it is printing normally for me. I'm wondering if a setting on your print job needs to be adjusted? Either way, I'm sorry for the wasted paper and hope that doesn't happen to you again. I did notice that the recipe prints out on several pages because of the images. I'll look into reformatting the how-to images to make the recipe card a little shorter. Thanks for leaving a comment.
Mela says
I love this recipe so much but for some reason I can’t get my bread to rise like your picture, I don’t know what I’m doing wrong, but the bread taste amazing
Tara Teaspoon Admin says
Hi Mela! I'm sorry it didn't rise the way you were hoping it would. There are a lot of factors that go into getting the perfect rise. Here's a few ideas to help you problem solve. 1. During winter months sometimes the ambient air is colder than we realize and it can affect the proofing periods. When it is colder, you might need to give the bread more time to proof. It needs to double in size. Make sure to choose a good location for the bread to proof in. I like to heat my oven to 100ºF, then turn it off to create a warm, draft-free space for my dough. 2. During the second proofing period, it's important not to over-proof the bread. It needs to be almost doubled in size because you want the oven spring to do the rest of the work right as the bread enters the oven (oven spring is the rapid rising process that happens during the first 10-15 minutes in the oven). 3. Another thing to consider is the age of your instant dry yeast. Unopened, it lasts about 2 years; opened, it lasts about 4 months. You can test the yeast by pouring a packet into about 1/4 cup of warm water mixed with a teaspoon of sugar. Let it sit for about 10 minutes to see if it gets bubbly/foamy. If it does, it is still good; if it doesn't your yeast is dead and should be thrown out.
I hope these ideas help, but if not, share more info about your process when you made the bread so we can troubleshoot more. Thanks.
Delaney says
Are you using a Bosch mixer? Do you notice the dough getting messy and not forming into a cohesive dough?
I have been making this recipe by hand and loving it, but it is so sticky and I’m always nervous to add too my flour. Even with the sticky dough, my bread always turns out perfect!
Tara Teaspoon says
Hi! I have used a Bosch and it works well. I still have a sticky dough but it's cohesive and not messy. I use both my Bosch and Kitchenaid for this recipe and both work fine. As you said you just have to know you'll work with a slightly sticky dough, but after that main proof it is easier to work with. Glad you like it!
Megan says
Love this bread recipe! I’ve made it multiple times!! I am wondering if I’d be able to freeze the dough after the first rise and shaping? Then thaw, rise and bake? I’m hoping to make up a bunch of dough then bake the next couple weeks as we need it. But curious if this would work?
Tara Teaspoon says
Megan I'm so glad you like it! I haven't taken the time to test this method, but it is a pretty standard practice for yeast dough. I think it should work just fine. Of course get it into the freezer as soon as you shape it so it doesn't start it's second proof. Happy baking!
Ellen Boerner says
i want to place another review in. I did not have hopes for this bread before baking it. it was so sticky the whole time. i figured what do ihave to lose, i placed the loaves in a bread pan and baked it. OMG!!! it came out so soft and delicious. i have NEVER had a bread come out like this. this is my new favorite. sorry about my previous review. if i knew how to take it back i would.
Tara T. says
Ellen this makes my day! I'm so, so glad it turned out well for you.
I'll leave your first review because it will be attached to the answer I gave and that might be helpful for others. But I sure appreciate you sending this in. Five stars for a great reader like you!
Tara
Ellen Boerner says
i followed this recipe to exact amounts and times. it never got out of the sticky stage. i was so frustrated. i used my Kitchen aid stand mixer. i kneaded it for the 10 to 12 min as stated in recipe on med to med low. just came out very sticky. stuck to bowl, couldnt get it all out. i think i may have to move on to look for another recipe
Tara T. says
Hi Ellen,
What about after it proofed? Once the gluten starts strengthening with the rising process the dough should become more structured and easier to work with. That's why there's always a note to flour a surface before kneading or forming...The recipe calculates for extra flour being added after proofing. Bread is also susceptible to the environment. If you live in a humid climate, if your flour is holding moisture or is more dry. It's ok to add a bit more flour if your dough is THAT sticky, or not add as much flour if you see the dough getting too stiff. Even if you weigh your flour, environmental factors can change the consistency of your dough. It is a very soft dough but gets less sticky as it rises and goes through the next kneading and forming processes. Hopefully in the end it worked out! Let me know if you have other questions.
Tara
Carla says
Can I use bread flour instead of all purpose in this recipe?
Tara Teaspoon says
Hi Carla. I haven't tried it with bread flour. Typically Japanese Milk Bread uses all-purpose because it doesn't need the higher protein for the structure. You can certainly try it, although it may make the crumb a bit more sturdy rather than soft.
Whitney says
Do you happen to know if this recipe will fit a 13" pullman?
Tara T. says
Hi Whitney,
I don't know if it would fit as I haven't tested it. My guess is it is slightly too much dough for a 13" pullman. The two loaves I make are very large and work well divided into three to begin with, so you may just want to try 3/4 of the batch in the pullman. Let us know!
Lisa says
Can you use whole wheat for this recipe as well?
Tara T. says
Hi Lisa, Unfortunately no. Using whole wheat flour won't work with this recipe. The coarseness of the bran in the flour cuts the gluten strands so the results are completely different, let alone the moisture content in whole wheat flour changes the chemistry.
I hope that helps you understand the reasoning. I have a half whole wheat dinner roll recipe that is divine if you'd like to try that! https://tarateaspoon.com/dinner-rolls-with-savory-seed-topping/
Best,
Tara
Charlie says
This is the absolute best “wonder style” bread I have made. Sooo nice and fluffy soft and the proofing time is half the time of the average white bread.
🥳🎉
Makayla says
This is absolutely fantastic. I’ve made it twice and will continue! I do have one question, we typically don’t go through it that fast so I have one of the loaves frozen. How long can it sit out on the counter ? I have a bread box I use but because it has holes I use a plastic bag in it. New and learning.. thanks for any tips!
Tara Teaspoon says
Hi Makayla, As with any homemade bread, it will stay fresh and delicious for 3-4 days on the counter. After that, it will start to dry out whether it's in a plastic bag/container or your bread box.
Storing a loaf in the freezer, sliced or unsliced is a great way to ensure freshness longer than a few days. Thank you!
Tara
Ila says
The dough is too sticky and I have to bathe my hands in crisco in order to handle it. I make the flour milk pudding quite thick. Last time I added extra flour which ruined the bread texture. Also when the loaves bake and rise they crack on the sides. I have extra moisture in the oven.I hope you can help and look for your reply. Thanks andBest wishes !!
Tara Teaspoon says
Hi Val, smart to use shortening to grease your hands to work with the soft dough! As you probably know, making bread dough successfully will depend on your environment, if it's humid, dry, etc. So you were right to consider adding more flour to the dough if you noticed it was too sticky. Perhaps next time just add a bit less. The other thing you can try is letting it knead several minutes longer. This will allow the gluten to strengthen, and as the dough proofs, the structure will strengthen even more and often that helps make it easier to work with. Those are both options to utilize when making dough in different environments. I live at sea level, surrounded by water in NYC, so while it's a standard place to test recipes, it means others may need to adjust their formulas.
As for the cracks on the sides, that moisture in the loaves does need to escape somewhere. The loaves in my pictures have cracks on the sides too, they are just not super prominent. If you'd like, you can totally make a knife slice down the middle of the loaf just before it goes into the oven. This will allow the moisture to escape there and form a traditional looking loaf. Thanks for asking the great questions!
Tara
Karen Diaz says
First try, first batch, perfection! I had been using a different recipe and practicing my baking of sandwich bread and my other recipe didn't hold up after a couple of days. It wasn't soft enough after a day or two. This recipe nailed it for me. I'm very pleased, but unfortunately, I need to find a recipe now for sandwich bread with fresh milled flour. I tried with this recipe just for kicks and it was an epic fail! It's such a different process with different results right out of the gate. I thought I'd I tried this one and just change one thing at a time, I might be able to work it out, but the flour gluten and protein content really changes the chemistry and yeast processing. However, this one will definitely be my go to recipe for sandwich bread with all purpose flour. The flavor and rise and perfect result with a softness that parallels store bought is amazing! Thank you so much for sharing.
KC says
I was looking at making a bread book with different recipes, this was my first recipe and the only one in my book. It is my favourite and a definite hit in our house. I have to make 2 loafs every week (I always give one away to family) I get asked to make even more all the time. It doesn’t taste yeasty which I love, it’s not a hard bread like some homemade breads, I compare it to the bakeries. Love love love! Thank you Tara for sharing this recipe. I do not need to look any further
Mina says
I love Japanese milk bread! It's so soft and fluffy! Can't wait to try this version soon!
Marysa says
I love a good bread. This does look so fresh and fluffy. I am intimidated of making bread, but your recipe makes it easy to go through the different steps.
nancy says
wow your Japanese milk bread turned out so fluffy and soft. everyone loved it and finished the loaf in one sitting!
Bernice says
What an absolutely stunning loaf of bread! You have shaped it so well. I haven't tackled milk bread yet, but I think your instructions are so clear and concise. I can give it a try!
Renee says
This is the best sandwich bread recipe I've ever tried! The bread is soft and delicious. Thank you!
Bob L says
This is absolutely the best bread I have ever made, possibly the best I have ever eaten. I have tried many recipes looking for the best sandwich bread. This is the one, I’ll look no further.
Tara Teaspoon says
Bob I'm so happy you found this recipe! I love it too. This comment makes my heart happy!
Stephanie says
What happens if I use active dry yeast
Tara Teaspoon says
Hi Stephanie, You will just need to activate it first. It makes for longer instructions. Instead of activating it in warm water (which would add liquid to the recipe) you can activate it in some of the milk.
Tara
Donna says
I'd like to make this in my bread machine. Could I just make the tangzhong, add it to the breadpan followed by the remaining ingredients? If course I'd have to half or do 3/4's if the recipe.
Tara Teaspoon says
Hi Donna,
I don't see why it wouldn't work. Yes, just add the tangzhong as you would the other ingredients into your bread machine. I wish you luck with the math cutting the recipe down, and would love to hear if it works in your machine! Fun!
Kevin says
Does this really take 2 TABLEspoons of yeast? Every other milk bread recipe I've ever done used 2 teaspoons.
Tara Teaspoon says
Hi Kevin,
Yes I use 2 tablespoons of instant yeast. It seems like a lot compared to other recipes you'll see. It is great, and helps the dough proof much faster. It doesn't affect the flavor and was my favorite amount in all my tests.
Tara
Amy J says
Can you use lactose free milk in this recipe?
Tara T. says
That should be totally fine! It won’t make a difference!
T a r a
Irene says
This was absolutely brilliant. My God was the bread soft !! Thank you for sharing this recipe! Btw, I made this in a pressure cooker, and it was gooooooood!
Tara Teaspoon says
Oh fantastic! Great to hear, thanks Irene. And so fun that you made it in the pressure cooker. Tara
Sherry says
How did you make it in the pressure cooker?
Tara Teaspoon says
Hi Sherry,
I don't make this in a pressure cooker. I never have. If you want to use a pressure cooker for part of the process I know some people like to proof their bread dough in one. But I don't use my pressure cooker for bread.
Tara
Tammy says
Can I double up this recipe and mix it by hand. I don't have a bread mixer and all my bread is done by hand mixing
Thank you
Tara Teaspoon says
Hi Tammy I haven’t tried it myself but I’m sure kneading it by hand will be great. I can’t give you details on texture clues because I haven’t run through it by hand, but it sounds like you’re familiar with the process.
Doubling it shouldn’t be an issue. Tara
Elizabeth Polson says
It reminds me in taste of Hawaiian rolls but has way less sugar than them. It is fluffy and not overly dense. Best bread I've ever made.
Lisalia says
The roux was GENIUS!! It worked perfectly and this was the fluffiest yummiest bread loaf I have ever made. It tasted so amazing and made the house smell heavenly! Thanks for this new recipe!
Emily says
What I love most about this bread is the lack of a super "crumby" texture. Most homemade white bread is a bit too dense and crumbles easily, but not this milk bread! It's a must for PB&Js.
Carla says
My bread had a weird almost chemical smell, did I do something wrong? Could it be from the yeast? The bread was so soft and delicious just had a off smell.
Tara Teaspoon says
Sorry to hear that Carla. It shouldn't have come from any of the listed ingredients. It certainly could just be a smell from the yeast that you aren't familiar with as it's going to let off gasses as it activates in bread. Overall it should simply smell like bread. See if your flour has taken on any scents from your kitchen environment. I'm glad it was soft and delicious regardless!
Carla Rapp says
Thank you for reply. It's likely the yeast smell, as you mentioned. The bread was so good. My family loved it, I was searching for a soft bread recipe. This is the one.
I'm going to try using bread flour and see how it turns out. Thanks again.
Mia says
This bread is absolutely DIVINE! Thanks! And thanks for the great instructions with photos. It’s like you are there with me in my kitchen!